

Charcoal Grills 101: Beginner’s Guide
Charcoal grilling delivers unbeatable flavor and the reward of tending a live fire hands-on. Briefly, it turns even a simple backyard cookout into something memorable, timeless. Getting it right comes down to a few key elements (fuel choice, fire control, experience), but above all, it starts with picking the grill that truly fits your style.
In this guide, we’ll walk through the main types of charcoal grills, their strengths and trade-offs, core fire management techniques, and practical tips to help you dive into the craft of live-fire cooking.
Ready to bring your grilling experience to the next level?
What Makes Charcoal Grilling Unique?
Few things rival the allure of a charcoal fire. Think about camping in the woods, firing up a chimney starter outside a snow-bound cabin, and, of course, that last unforgettable meal cooked over glowing coals (the way the smoke carried the aroma of sizzling meat and hardwood!).
The appeal of charcoal comes down to three points: flavor, tradition, and granular fire management. Wooden fuel (whether logs, briquettes, or lump charcoal) infuses food with smoke, adding depth and character, and it can even be used for smoking. Gas and electric grills simply can’t match that: they burn clean or, worse, leave behind an off-tasting edge.
Charcoal also offers a raw, hands-on experience rooted in primal cooking. Fire up red oak, and you’re instantly transported to California’s Central Coast ranches, where cowboys gathered around open flames for Santa Maria tri-tip and tall tales. Burn quebracho, and you’re on the Pampas, savouring the flavor of a true Argentinian asado.
But mastering live fire isn’t reserved for seasoned pitmasters. Different charcoal grill types make it possible for anyone to enjoy the flavor and craft of wood-fired cooking:
-
Kettle grills: Round, lidded, and America’s favorite. Versatile, beginner-friendly, and equally at home grilling or smoking.
-
Argentinian grills: Open-frame with V-shaped grates. Perfect for feasts where abundance and variety rule.
-
Santa Maria grills: Built with adjustable grates for grilling over open flame. Visually striking, versatile, and capable of delivering professional results with beginner-friendly ease.
Pro tip n°1→ Stan of the Central Coast flair? Browse our catalogue and discover your next Santa Maria grill.

Choosing the Right Charcoal Grill
At Gaucho Life, we see wood-fueled grilling as an art: honed with patience, care, and the right tools. To help you find the perfect grill, let’s break down the features that make each charcoal grill type a unique path to smoky perfection, no matter your fire-tending experience.
Kettle Grills
The wild card of cozy, convenient grills. A kettle typically has a round cooking chamber. Charcoal rests in a bottom bowl, while food cooks on grates above. Most models include an ash catcher for easy cleanup.
Built from rust-resistant steel and porcelain enamel, they combine durability with a backyard-friendly look. Many also come with a wide ecosystem of accessories to boost versatility.
These charcoal grills run on lump charcoal or briquettes, though wood logs are out, as space inside is limited. Temperature is managed with adjustable vents, and the lid allows convection-style cooking or smoking.
Best for → Beginners, budget-conscious grillers, and anyone looking for versatility in a small footprint.
Argentine Parrillas
At first glance, rugged and simple, but legendary in practice. Built for the outdoors with durable materials like iron or 304 stainless steel, these gaucho-style Argentinian grills work both as permanent fixtures or portable setups.
Their large, open frame makes them ideal for grilling multiple cuts (or even whole animals) at once. These charcoal grills feature V-shaped grates, set about 6 inches over the coals, channel fat away to prevent flare-ups.
Fueled by hardwood coals or logs, they often include a side brasero (firebox) for steady ember production. While mainly used for grilling, with foil or a cover, parrillas can sometimes double as smokers. Iron griddles or baskets are great for smaller items.
Best for → Asado purists, crust seekers, and seasoned grillers looking for a challenge.
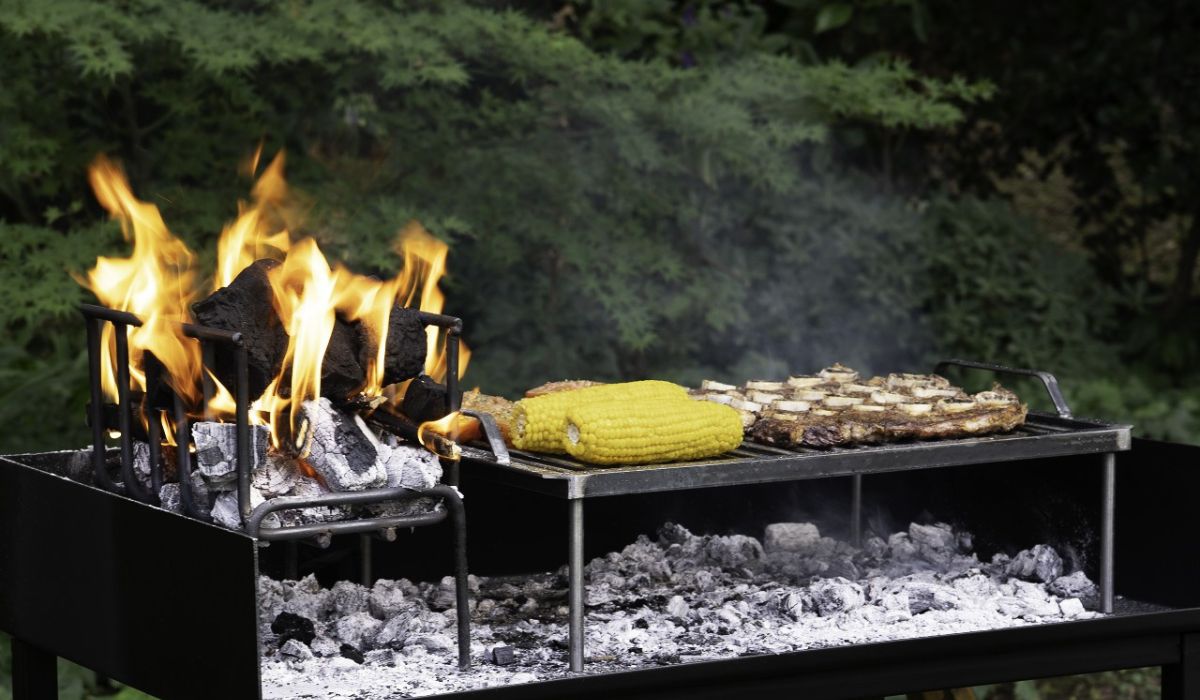
Santa Maria Grills
Practicality meets spectacle with Santa Maria grills. Their signature is a suspended grate, height-adjustable via crank. This lets you intuitively control the heat (lower for searing, higher for slow cooking) and makes them impressively versatile, great for searing or slow-cooking.
Well-built Santa Maria grills can be pricier due to their mechanics, but with proper care they’ll last a lifetime. Budget-friendly kettle attachments offer a taste of Central Coast style, though without the full experience provided by a dedicated grill or insert.
These grills thrive on hardwood lump charcoal or logs for maximum flavor and flame. Briquettes are usually avoided since the visual drama and authenticity of Santa Maria cooking come from a live fire.
Best for → Versatility, show-stopping style, and pro-level results with beginner-friendly ease.
Must-Have Accessories
Fire control isn’t just about the grill, but also about using the right tools. Here’s a basic toolkit for charcoal grilling:
-
Chimney starter. A metal cylinder that channels heat and airflow to quickly ignite coals, ensuring they ash over evenly for consistent cooking.
-
Heat-resistant gloves. Protect your hands when adjusting vents, grates, or hot tools. Look for models with long cuffs and ratings of 450–500°F or higher.
-
Poker and shovel. For breaking up large charcoal chunks and arranging embers under your charcoal grill.
-
Grill brush. Even top-tier grills won’t last without cleaning. A stiff wire brush clears char and ash, prevents sticking, and wards off rust. Pair with an ash bucket for safe disposal.
-
Grill cover. Protects your grill from weather, dust, and debris. Go for waterproof, heat-resistant options.
-
Long tongs. A must-have to remove or flip food without getting too close to the fire or piercing it.
-
Instant-read thermometer. Ensures safe internal temperatures, prevents overcooking, and teaches you how to manage heat zones with confidence.
Pro tip n°2→ Wondering if you can grill under a gazebo for extra shelter? We’ve got you covered! Head to our blog for safe setup tips

Charcoal Fuel Choices: Lump Charcoal vs. Charcoal vs. Briquettes
Once you’ve chosen the charcoal grill that best suits you, it’s time to look at fuel options:
-
Charcoal lumps. Made from natural hardwood burned down into irregular chunks. They deliver a hotter, cleaner burn with less ash and fewer chemicals than briquettes, making them perfect for quick grilling or high-heat searing. Cons? They’re usually pricier than other fuels and burn faster.
-
Briquettes. Compressed blocks of sawdust, charcoal dust, and binders. They burn longer and more consistently than lump, though not quite as hot. They’re ideal for steady fires and long cooking sessions. Cons? They don’t produce as much smoke as lump or wood. Cheaper versions include fillers, leaving a chemical aftertaste.
-
Hardwood logs. Burned down into glowing embers in a side brasero or directly under the grill for a truly authentic live-fire experience. While they take more time and skill to manage, they reward you with a distinctive smoky character and the appeal of the open flame. Popular choices include hickory, quebracho, mesquite, oak, and apple.
The rule of thumb? Briquettes are low-maintenance, making them a smart choice for beginners or when cooking thick cuts that need steady heat. Lump charcoal burns hotter and faster: perfect for grilling burgers or if you’re in a rush and comfortable managing fire. Hardwood logs demand the most experience (and usually an Argentine brasero) to keep the fire organized.
You may also like: Learn how to grill picanha like an Argentine asador and elevate your BBQ game.
Lighting and Managing Your Charcoal Fire
You’ve got the charcoal grill. You’ve got the fuel. What’s next? Well, here’s the drill:
-
Light the fire. For even, clean lighting, use a chimney starter, loaded with briquettes or lump charcoal (never lighter fluid: it leaves chemical residue). Place crumpled paper, a natural fire starter, or, better yet, paraffin cubes under the chimney and light from below.
-
Wait until the top coals ash over. Black or half-lit coals give off harsh, acrid smoke that will ruin flavor. Properly lit charcoal takes about 15–20 minutes: you’ll see mostly gray coals with a faint red glow and a clean, steady smoke. Halfway burned, the top coals will show patches of grey.
-
Carefully pour the coals into your grill. Wearing heat-resistant gloves, use a poker to set up a two-zone fire: more embers on one side for direct cooking, fewer on the other for indirect heat. This setup helps prevent burning and allows techniques like reverse searing.
-
Test gauge heat. Some kettle grills come with a thermometer to help you adjust the temperature. For open fire grills, your hand can be your best friend to judge heat. How? Hold your palm approximately 3 inches above the grates and count how many seconds you can hold it:
-
2-4 seconds. High heat (500–650°F), ideal for searing.
-
5-7 seconds. Medium heat (400–500°F), best for chicken breast, burgers, or BBQ vegetables.
-
8-10 seconds. Medium-low (325–375°F), for indirect roasting, sausages, and fish.
-
11-13 seconds. Low (225–275°F), for grilling thick cuts, such as ribs, or smoking briskets.
-
Control the heat while cooking. Kettle grills use adjustable vents (open them for higher heat, close them to cool things down). Argentine parrillas require rearranging coals by hand, which takes more practice. Santa Maria grills are more intuitive and immediate, transforming the experience from guesswork to craft: just raise or lower the grate for precise temperature control over the flames.
-
Finally, avoid flare-ups. Choose a grill with slanted grates that channel drippings away from the coals, keeping the fire steady and the flavor clean. Using a side firebox (brasero) adds even more authenticity, letting you burn wood down to clean embers for unmatched flavor.
Pro tip n°3→ Using a kettle grill? For smoking (225–275°F), keep the bottom vent just cracked open and the top one mostly open. For searing (500°F+), open both fully.
Your First Charcoal Cook
Already picturing what you’re going to cook on your brand-new charcoal grill? Hold on just a little longer! First of all, you need to “break in” your grill. This first burn does two things: it burns off any chemical residues or factory dust, and it seasons the grill. Here’s how:
-
Unpack and assemble your grill. Wipe away any packaging debris or factory dust.
-
Fire it up with a full load of charcoal, lit in a chimney starter or directly in the grill.
-
Let it burn for 30–45 minutes. If you’re using a kettle grill, keep the vents fully open.
-
Cool it down naturally, closing the vents if it’s a kettle.
-
Brush the grates with a stiff wire brush or crumpled foil.
-
Lightly oil the grates with a paper towel held by tongs, ideally while still warm.
These steps help prevent rust, reduce sticking, and get your grill ready for real cooking.
Once your grill is seasoned, it’s time to cook. If you’re a beginner, either to charcoal grilling in general or to a new grill style, learn to manage timing and fire with simple cuts before tackling bigger challenges. A beautifully marbled ribeye is perfect for this:
-
Fire up the grill with a chimney starter. Once the coals ash over, arrange a two-zone fire. On a Santa Maria, just raise the grate.
-
Preheat for 15 minutes and oil the grates to prevent sticking.
-
Place the ribeye over indirect heat and cook until the internal temperature hits 120°F.
-
Flip with tongs and move to direct heat (or lower the grate).
-
Sear 1–2 minutes per side, until the internal temperature reaches 132°F.
-
Rest for 10 minutes before slicing to redistribute the juices.
-
When the grill cools, finish by brushing away debris with a wire brush.
Pro tip n°4→ Not a fan of ribeye? Discover your next grilling obsession among the best cuts for Argentinian grilled meat.

Common Mistakes & How to Avoid Them
Great charcoal grilling isn’t just about what you do, but also about the mistakes you avoid. Here’s a breakdown of common slips that can seriously hinder your grilling experience if left unchecked:
-
Not waiting for the coals to ash over. Grilling on freshly lit coals produces acrid smoke and uneven cooking. For small loads, wait 15–20 minutes; for larger ones, 30–40, until charcoal is mostly gray and gives off only a thin smoke.
-
Using lighter fluid. It leaves food with an unpleasant chemical taste and increases the risk of flare-ups. Instead, use natural starters like paper, paraffin cubes, or a chimney starter.
-
Skipping the two-zone setup. This can lead to burnt or undercooked food, especially when grilling different items at once. Master two-zone cooking and you’ll enjoy perfectly seared and thoroughly cooked results every time.
-
Overreacting to flare-ups. Flames are part of charcoal grilling. If they flare, simply move food to a cooler zone. Spraying water only cools the coals and slows cooking. V-shaped grates also help by channeling fat away.
-
Neglecting grill maintenance. Ash buildup, grease, and food residue shorten your grill’s lifespan by promoting rust. The fix? Clean your grill after every session and cover it when stored.
Pro tip n°5→ Want to dive deeper into grill care? Check out our guide on how to keep grill grates from rusting.
FAQs
Still curious about charcoal grills? Here are the answers to some of the most common questions we hear. If yours isn’t listed, feel free to reach out. We’re always happy to help!
What is the best charcoal grill for beginners?
Kettle grills are often the go-to choice for beginners: they’re budget-friendly, versatile, and easy to learn on.
Santa Maria grills with V-shaped grates (like Gaucho Life’s) are also a great option for beginners who want the open-fire appeal with a simple, intuitive fire management system.
Should I use lump charcoal or briquettes?
Depends on your cooking style:
-
Briquettes excel at low-and-slow BBQ thanks to their steady, constant heat and low maintenance.
-
Lump charcoal burns hotter, making it ideal for high-heat searing, and adds a distinctive smoky character.
-
Advanced grillers can also burn hardwood logs in a side brasero for even deeper flavor and authenticity.
How do I set up a two-zone fire?
Once the charcoal is fully ashed over, bank most of it to one side of the grill for direct heat. Spread the rest on the opposite side for indirect cooking. Want finer control? A Santa Maria grill lets you adjust grate height over the fire for precision cooking.
Why upgrade to a Santa Maria or Argentine-style grill?
Upgrading to a Santa Maria or Argentine gaucho grill is more than just changing your grill: it’s unlocking a new, more authentic way to cook over live fire.
Argentine grills deliver unmatched tradition and flavor but require more hands-on skill. Santa Maria grills, on the other hand, offer beginner-friendly precision with adjustable grates and, when paired with V-shaped Argentine-style grates, a reduced risk of flare-ups.
From Sparks to Skill: Your Charcoal Grilling Kickoff
Time to set your grilling potential ablaze! Gas and electric cooking may be practical and indoor-safe, but nothing compares to the reward of grilling over white-hot coals or an open flame. Tending a charcoal fire can be challenging, but it unlocks a timeless ritual that blends flavor, community, and skill.
At Gaucho Life, we craft grills designed for versatility and durability, helping you get the most out of every backyard meal, whether you’re just starting or you’ve been working the fire for years.
We believe tradition is alive, evolving with each cook, yet always rooted in authenticity. Our catalog is a testament to craftsmanship, merging Argentine heritage with American innovation. From adjustable-height grates to brasero fireboxes and V-shaped grates, our grills are built to last and to elevate every cookout into a celebration of fire, flavor, and friendship.
Because in the end, it’s about more than just grilling. It’s about the lifestyle

Read more
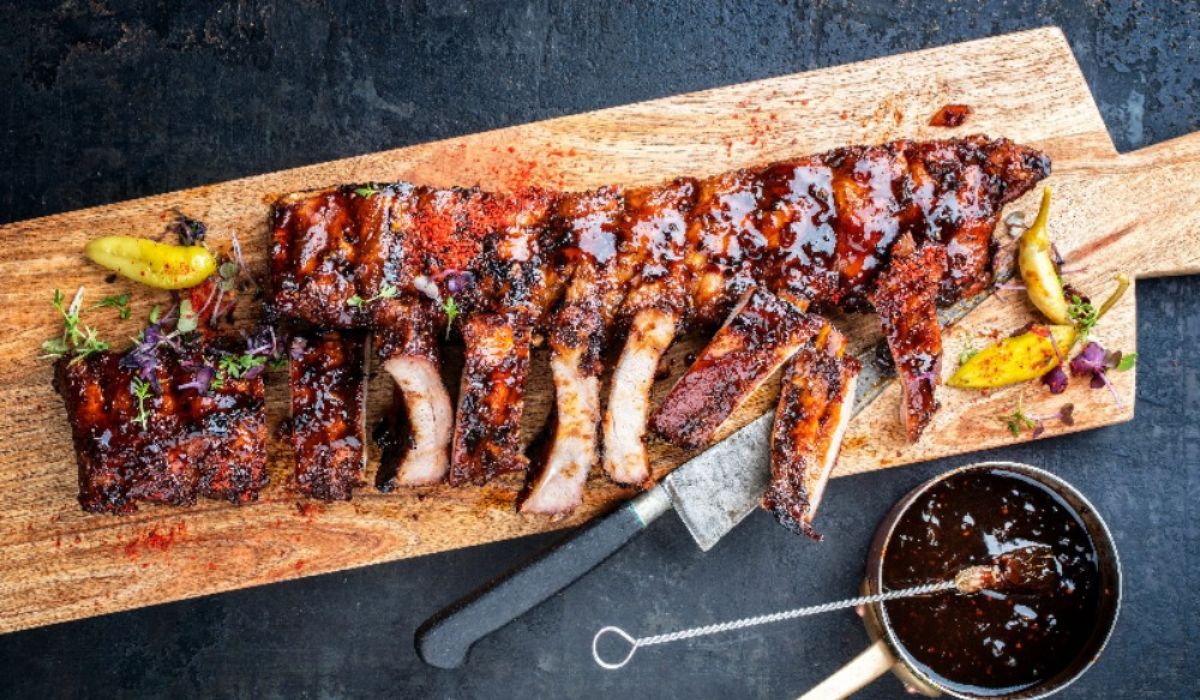
How to Cook Ribs on a Santa Maria Grill
Cooked until the bone pulls back and the meat falls apart, fire-kissed ribs are a staple of American backyard cuisine. This cut lets you go beyond basic BBQ, creating a one-of-a-kind bite whether y...
Leer más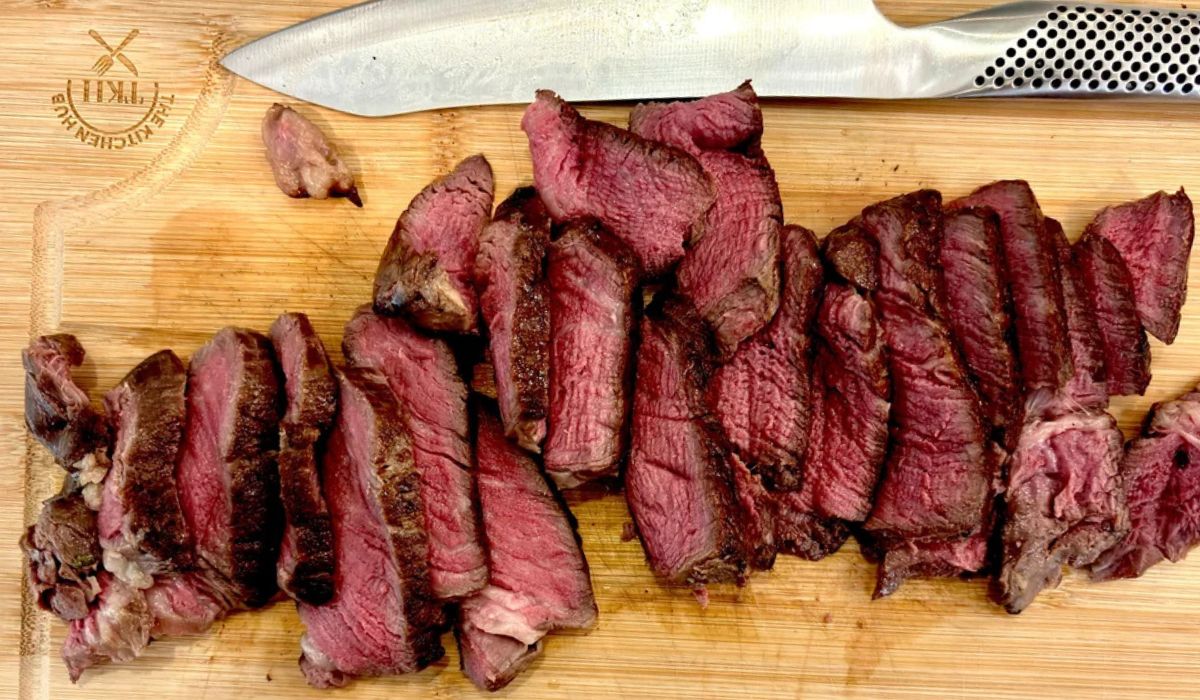
The Gaucho Life’s Beginner’s Guide to Grilling
Grilling is one of the oldest cooking methods, simple at its core, yet richer than it seems. All you need is fire, smoke, and a little patience to turn a meal into a celebration of fire-kissed flav...
Leer más
Dejar un comentario
Este sitio está protegido por hCaptcha y se aplican la Política de privacidad de hCaptcha y los Términos del servicio.